A bill is a request for payment you receive from a vendor. GnuCash can track bills.
When you receive a bill from a vendor and want to enter it into GnuCash, you must create a new bill. To create a new bill use the Business -> Vendor -> New Bill menu item, and fill in the resulting window appropriately.
Invoice Info - Invoice ID (optional) - the identification number of the invoice as emitted by the vendor (IE: the vendor's internal number for this invoice).
Invoice Info - Date Opened - the date the Invoice was emitted by the vendor.
Billing Info - Vendor - the issuing vendor.
Billing Info - Job (optional) - associates a vendor job with this bill. Vendor jobs are described in the following section.
Billing Info - Billing ID (optional) - the vendor's ID for the bill (e.g.: their invoice #).
Billing Info - Terms - the pay back terms agreement for this bill. A list of registered terms is available within the pop up menu. If you specified a a default value for the selected vendor, this field is initialized with the default.
Chargeback Project - Customer (optional) - the customer to associate with this bill. This is used to charge your customer later.
Chargeback Project - Job (optional) - the customer job to associate with this bill.
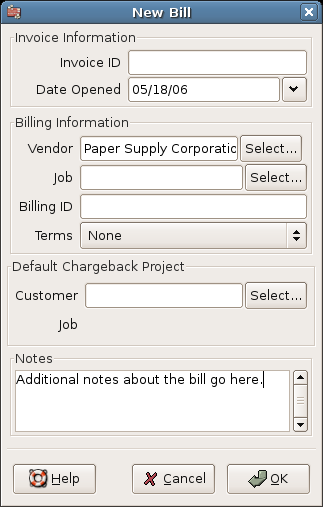
New Bill Registration Window
When you click the OK the Edit Bill opens.
From the Edit Bill window you can enter an itemized list of things purchased, in a manner similar to how the account register works.
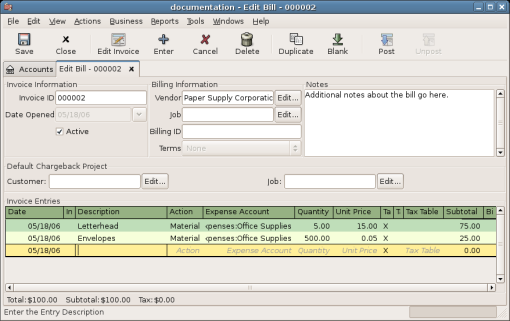
Edit Bill Window
There are 12 columns in the Invoice Entries area:
Date - The date this item was sold.
Invoiced? - X means the item is attached to this invoice, an empty box means the item is not attached to this invoice. If the box is empty you can attach the item to the invoice by first selecting the item row and then clicking in this box.
Description (optional) - is what the item or service is called.
Action (optional) - is a user defined field. You can place Cost Center information here, or use one of the 3 predefined actions, Hours, Material, or Project.
Expense Account - selects the expense account to change for this item.
Quantity - tracks how many of the items you bought.
Unit Price - is the unit price of the item.
Taxable? - is this item taxable? X means yes, a blank field means no. You can click the field to toggle the setting.
Tax Included? - has the tax already been included in the unit price? X means yes, a blank field means no.
Tax Table (optional) - this is a pop up menu of all the available tax tables. If the item is taxable and tax has not been included in the unit price, then this tax table is used to compute the amount of tax.
Subtotal (uneditable) - computed subtotal for this item (less tax)
Billable - is this item billable to the chargeback customer/job?
When you have finished entering all the items, Post the bill.
When you finish editing a bill, you should Post the bill. You do not have to post the bill, you can close it and return to it later. You have to post the bill eventually. Posting a bill places its transactions into an accounts payable account. The Post Bill window appears and asks you to enter information:
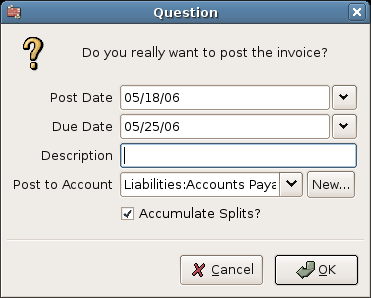
Post Bill Window
Post Date - specifies the date for the transactions entered into the accounts payable account.
Due Date - is the date on which payment for the bill is expected.
If you specified payment terms when you created the bill, the date is calculated according to selected terms, and the entry field is insensitive.
If you did not specify payment terms, enter the expected payment due date here.
Description - is an arbitrary description. When bill transactions are placed in the accounts payable account, this description is entered in the memo field of those transactions.
Post To Account - selects the accounts payable account in which bill transactions are posted. You can select the account from a list of existing A/Payable accounts.
Accumulate Splits - determines if bill items which transfer to the same account are combined into a single split for that account or entered individually. For the sample bill for Letterhead and Envelopes, the setting affects post results as follows:
Checked (splits are accumulated) - a single transfer of $100.00 to the Expenses:Office Supplies account is recorded.
Not checked - the transaction created in the A/Payable account, shows two transfers to Expenses:Office Supplies account $75.00 and $25.00. The memo fields in the splits indicate the purchase of Letterhead and Envelopes (the item descriptions entered on the bill) respectively.
To find an existing bill, use the Business -> Vendor -> Find Bill application. From the results of the search, you can select a bill to edit, or view.
 | 注意 |
|---|---|
Before you can edit a posted bill, you will need to Unpost it. | |
| 注意 |
|---|---|
There are other ways to access an existing bill. These are similar to accessing invoices for your customers. See the section on finding invoices in the accounts receivable chapter for more information. | |