An invoice is the paperwork you send to a customer to request payment for products or services rendered. GnuCash can generate and track invoices.
To send an invoice to a customer you must first create a new invoice. To create an invoice use Business -> Customer -> New Invoice. The New Invoice window must be filled in appropriately:
Invoice Information - Invoice ID - the identification number of this invoice. This is your internal number for this invoice. If you leave it blank, an invoice number will be generated automatically.
Invoice Information - Date Opened - the date this invoice was created.
Billing Information - Customer - the customer who is to receive this invoice. Use the Select button to access the Find Customer window described in the previous section. When you have looked up the customer to be invoiced, click the Select in the search window to select the customer.
Billing Information - Job (optional) - associates the new invoice with a customer job. Customer jobs are described in the following section.
Billing Information - Billing ID - this is the customer's PO Number or other "customer reference number". You should use it to identify your invoices to this customer (and job, if you have one).
Billing Information - Terms - the payback terms agreement for this invoice. A list of registered terms is available within the pop up menu. If you specified a default value for the selected customer, this field is initialized with the default.
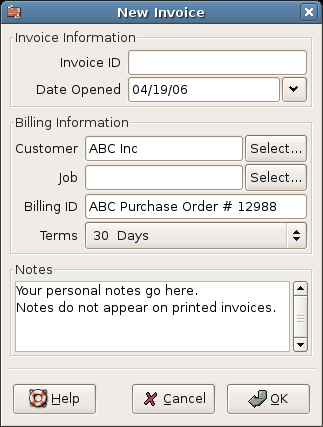
Creating a New Invoice
When you click the OK button, the Edit Invoice window opens.
From the Edit Invoice window you can enter an itemized list of things you sold on this invoice, in a manner similar to how the account register works.
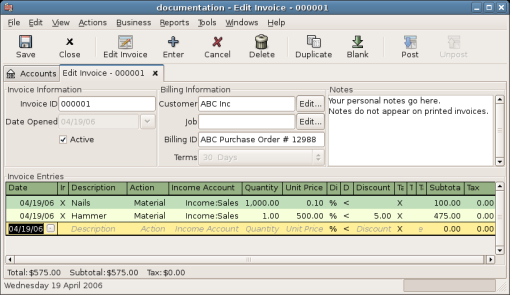
Edit Invoice Window
There are 15 columns in the Invoice Entries area:
Date - The date this item was sold.
Invoiced? - X means the item is attached to this invoice, an empty box means the item is not attached to this invoice. The item is attached for you when you proceed to the next line item.
Description (optional) - is what the item or service is called.
Action (optional) - is a user defined field. You can place Cost Center information here, or use one of the 3 predefined actions, Hours, Material, or Project.
Income Account - selects which income account is credited with this income.
Quantity - tracks how many of the items you sold.
Unit Price - is the unit price of the item.
Discount Type - is the type of discount:
$ means Discount is a monetary value
% means Discount is a percentage.
You can click the field to toggle between the discount types.
Discount How - the discount can be computed as follows:
> means the discount applies after tax.
< means the discount applies before tax.
= means both discount and tax are applied to the pretax value.
You can click the field to change the setting.
Discount (optional) - is the total discount, in monetary units or percentage, depending on Discount Type. You can leave it blank for no discount. Any default discount you specified for the customer will be automatically entered for each new item.
Taxable? - is this item taxable? X means yes, a blank field means no. You can click the field to toggle the setting.
Tax Included? - has the tax already been included in the unit price? X means yes, a blank field means no. For example, if there is 1 item of $100 with a tax of 5% then:
If Tax Included is empty, then subtotal = $100 and tax = $5.
If Tax included is set (X), then subtotal = $95.23 and tax = $4.77. The computation is: Subtotal = Total / (1+taxrate) and Tax = Total - Subtotal = Total - (Total / (1+taxrate)).
Tax Table (optional) - this is a pop up menu of all the available tax tables. If you make the item taxable, then this table is used to compute the amount of tax. The tax table determines tax percentages and the accounts to which tax is charged.
Subtotal (uneditable) - is the computed subtotal for this item (less tax).
Tax (uneditable) - is the computed tax for this item.
When you have finished entering all the items, you can Post and print the invoice.
When you finish editing an invoice and are ready to print, you must Post the invoice. The invoice does not have to be posted immediately. In fact, you should only post an invoice when you are ready to print it. Posting an invoice places the transactions in an accounts receivable account.
The Post Invoice window appears and asks you to enter information:
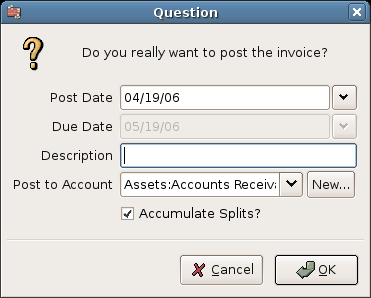
Post Invoice Window
Post Date - specifies the date for the transactions entered into the accounts receivable account.
Due Date - is the date on which payment for the invoice is expected.
If you specified payment terms when you created the invoice, the date is calculated according to selected terms, and the entry field is insensitive.
If you did not specify payment terms, enter the expected payment due date here.
Description - is an arbitrary description. When invoice transactions are placed in the accounts receivable account, this description is entered in the memo field of those transactions.
Post To Account - selects the accounts receivable account in which invoice transactions are posted. You can select the account from a list of existing A/Receivable accounts.
Accumulate Splits - determines if invoice items which transfer to the same account are combined into a single split for that account or entered individually. For the sample invoice which sold Nails and a Hammer, the setting affects post results as follows:
Checked (splits are accumulated) - a single transfer of $575.00 from the Income:Sales account is recorded.
Not checked - the transaction created in the A/Receivable account, shows two transfers from Income:Sales account $100.00 and $475.00. The memo fields in the splits indicate the sale of Nails and the Hammer (the item descriptions entered on the invoice) respectively.
To find an existing invoice, use the Business -> Customer -> Find Invoice application. From the results of the search, you can select an invoice to edit or view.
 | 注意 |
|---|---|
Before you can edit a posted invoice, you will need to Unpost it. | |
One of the design goals in GnuCash's Account Receivable system was to allow different processes to get to the same state, so you can reach an invoice from different directions based on the way you think about the problem:
You can search for the customer first, then list their invoices.
You can search for invoices by number or by company name.
You can list invoices associated with a customer job.
After you post an invoice, you should print it and send it to your customer. To print an invoice use File -> Print Invoice menu item.
An example of the default GnuCash invoice print output is shown below.
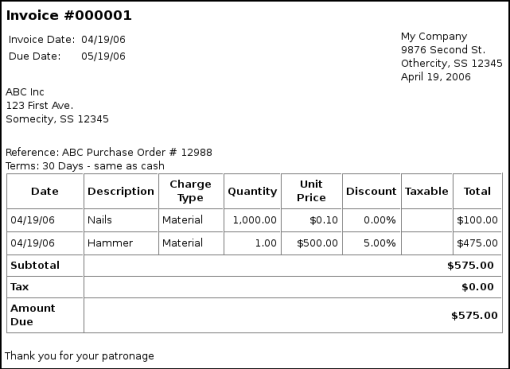
Invoice Print Output
| 注意 |
|---|---|
You can modify the appearance of the invoice, IE: add a company logo, etc. To do so, see the 項12.9. | |
Invoices can also be printed from the main window by selecting Reports -> Business Reports -> Printable Invoice from the main menu. The resulting report window states that no valid invoice is selected. To select the invoice to print:
Use the Options tool bar button or select Edit -> Report Options from the main menu.
Select the General tab of the report options dialog.
Click the Select button next to the Invoice Number field.
Search for the invoice as usual.
You can also print invoices from within the Process Payment dialog. See the 項12.8 for instructions on how to do so.
There is no easy way to assign an automatic starting invoice number. GnuCash starts with number 1 and increments from there. You can manually type an invoice number into the text box each time you create an invoice, but this gets tiring and sooner or later leads to duplicate numbers.
You can change the starting invoice number if it is important you. There is no user interface to change the number at this time. You have to hand edit your XML data file. The relevant entry is in the "counters" section near the beginning of the file. The file must be re-opened after editing.
| 注意 |
|---|---|
GnuCash optionally compresses files. Disable compression and save before editing the file. To enable or disable compression use Edit -> Preferences, access the General tab, and select or deselect the Compress Files check box. | |