The account register is the GnuCash window which allows you to view or edit preexisting transactions, or add new transactions for a particular account. To enter the account register, simply highlight the account name in the account tree window and double-click to open it. You can also click the Open button in the tool bar or use the right mouse button menu to open the account. GnuCash will display the account register window.
For example, starting with the chart of accounts we created in the previous chapter gcashdata_3, double click on the checking asset account. Let's add a simple transaction to the checking account. When you first create your accounts in GnuCash, it is common to start them off with an initial balance.
In the first transaction row, enter a date (eg: March, 1, 2006), a description (eg: "Opening Balance"), click on the Transfer pop-up menu and select Equity:Opening Balances, add a deposit value of $1000, and press the Enter key. The account register should now appear similar to this figure:

This image shows Assets:Checking - Register after inserting a starting value transaction.
Setting the starting balances of an account is an example of a simple two account transaction. In this case, affecting the Assets:Checking and the Equity:Opening Balances accounts.
As another example of a simple 2 account transaction, add another transaction to describe the purchase of $45.21 worth of groceries. From within the Assets:Checking account, you would set Transfer to Expenses:Groceries. The account register should now appear:
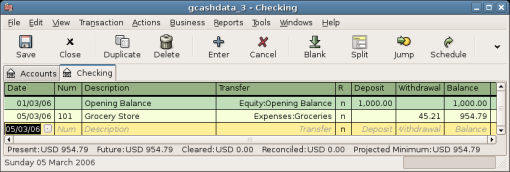
This image shows Assets:Checking - Register after adding a transaction for groceries.
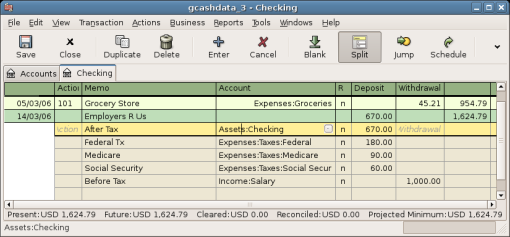
The need for 3 or more account transactions occurs when you need to split either the "from" or the "to" account in a transaction into multiple accounts. The classic example of this is when you receive a paycheck. Your take home pay from a paycheck will typically be less than your net pay, with the difference being due to taxes, retirement account payments, and/or other items. Thus, the single transaction of you receiving a paycheck involves other accounts besides simply Assets:Checking and Income:Salary.
To add a paycheck transaction from the Assets:Checking account register window, click on a new transaction line, and click on Split. First enter the description of this transaction on the first line (eg: "Employers R Us"). In the "split" line below this, enter the deposit into Assets:Checking (eg:$670) (This is due to a current bug, that demands the first line in a split is the actual account). Follow this with the various tax deposits (Assets:Checking (eg: $670), Expenses:Taxes:Federal (eg: $180), Expenses:Taxes:Medicare (eg: $90), and Expenses:Taxes:Social Security (eg: $60)) and lastly the gross total of your paycheck (eg: $1000) as a withdrawal transfer from Income:Salary. The final split should look like this:

This image shows Assets:Checking - Register after adding a split transaction for salary.
The title bar of the account register displays the account name, which in this case is Assets:Checking. Below the title bar, the menu bar displays the menu items available within the account register, and the tool bar contains handy buttons that help you work with the account register.
Although each transaction has at least two splits, all you see in the basic register is a summary of the splits affecting the current account. In the Transfer column, you can see the other account from which money is transferred into or out of this account. If the transaction affects more than two accounts, GnuCash displays -- Split Transaction -- to show it is a multiple-split transaction. You can see the individual splits of each transaction by clicking the Split button in the tool bar while selecting the appropriate transaction.
For split transactions, the first line of the transaction is the transaction line. It contains a Date, optional Num (such as a check number), transaction Description, total amount affecting the current account (Tot Deposit here), and updated account Balance after the current transaction. Note that in the expanded view, the Transfer column heading disappears, and there is no account name listed in that field. This line shows you only a summary of the transaction's effect on the current account. For more detailed information, you need to look at the individual splits that make up the transaction.
The partial lines below the transaction line are the split lines, and they are separated by gray lines. As you highlight one of the split lines, the column headings change to show the split-related fields:
This image shows how split headings change.
Each split contains an optional Action, or type of split, which you can either type in or choose from a pull-down list. The split also contains an optional Memo which describes the split. Each split affects an Account, which can be selected from a pull-down list of your accounts. The R field indicates whether the split has been reconciled. The last two columns show the amount of the split and whether money is coming into or going out of the account.
As we discussed in 項2.1, total debits (left-column entries) must equal total credits (right-column entries) for each transaction. In the example shown above, the total debits equal the total credits, so this transaction is balanced. If you notice, the transaction line contains the same debit amount as the Checking split line. Why is this shown twice? Because the transaction line is merely a summary of the transaction's effect on the current account. The same transaction in a different account will have a different transaction line, one that shows the effect on that particular account. You can see this by highlighting another split line and clicking the Jump button on the tool bar.
In this example, if you jump to the Income:Salary account, GnuCash brings up the same transaction in the Income:Salary - Register:
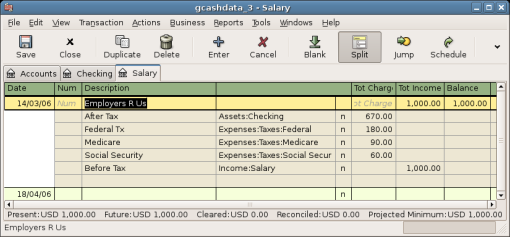
This image shows a jump to the Income:Salary account.
Note that the transaction line total now summarizes the effect on the Income:Salary account instead of the Checking Account, because you are looking at the Income:Salary account register. The splits are exactly the same, but the transaction line now reflects the credit to the Income:Salary account.
At the bottom left of the register window, GnuCash displays helpful messages as you move about the register. To the right, you can see the current account balance and the total of cleared splits.